

How to Sculpt An Increased-Layered Form
- Elizabeth Batt
- Sep 24, 2020
- 2 min read

A step-by-step on how to Sculpt an Increased Layer Form.
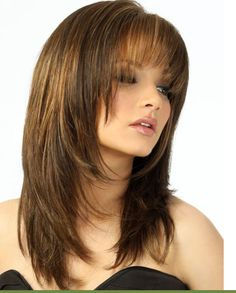
Sculpting an increased layer form
Hair is generally sculpted from a side part or a middle part.
Position the head in an upright position to sculpt this form, you can tiled the head forward when sculpting if the hair is at a longer length.
The parting patterning could be 3 of the following options: vertical, horizontal, and diagonal. For vertical partings, you will need to distribute the hair forward using perpendicular distribution; this will have shorter lengths around the face and a decreasing layered texture toward the back of the head. From horizontal partings, you’ll need to distribute the hair upward using perpendicular distribution. Using horizontal partings positions will layer texture equally around the head. For diagonal partings, you will need to distribute the hair diagonally using perpendicular distribution. Part the hair along the opposite diagonal line. An example is if you want the hair to be positioned diagonal forward, you will need to part the hair in a diagonal back parting.
For this sculpture, you will be using a stationary design line. The projection angle of the stationary design line is important because this will be the location in which all other lengths will be converged. The farther hair travels to reach the design line, the longer the hair will be.
The projection angle will be 90*. For a more consistent projection angle, stand on the other side of the head and bring the hair over to the stationary design line.
The finger/shear position will be either parallel or non-parallel depending on the desired hair length. A parallel finger position from a horizontal parting will create even layering throughout the head. A parallel finger position from a vertical parting will create shorter side lengths that will frame the face with diagonal back layering to still give length.
With the converging layering technique, you will pull the hair to the same stationary design line every time. Be sure to be cross-checking for balance and symmetry.
Once the sculpture is completed, air form the hair to the style of your choice.


Comments